Wear your ply with pride pt. 16

Finally I've finished this project.

It was a bit of struggle at times, but I do this as a learning exercise. If I just wanted a nice wood finish Rhoads I could have bought one. Well, assuming I could find one, Jackson don't actually make one in a plain wood finish.

I was lucky the wood of the top ply I revealed on sanding it was fairly attractive, it could have been nasty, all full of knots and filler.

The 'terrace' tremolo inset I had to do to rescue it after shifting the tremolo forwards is a little odd looking but not totally stupid.

Having taken the finish off the face of headstock it's cleaned up pretty nicely and the waterslide decal worked great after a couple of false starts.

The real reason I saved this though is that the neck is really nice to play and the single coils seem decent.

Wiring the pickups up in series has made a real difference, especially if you do things like use the neck single coil with one coil of the humbucker. It's not like a strat, but much warmer and like a neck humbucker without being at all muddy because the bridge lightens the tone.

I made the humbucker coil split so you can select which coil you use. Used on it's own you can get a choice between the real icepick sound of the south coil or a slightly more usable north coil. Then when used with the other pickups, swapping which of the coils you use doesn't make a massive difference in sound but does mean it can be hum cancelling with either the neck or middle pickup.

The cheap Iron Gear Steamhammer humbucker is quite high output but that just means each coil is pretty well balanced with the single coils and with everything on in series it's kind of like having two standard humbuckers.

Using the two single coils together is very reminiscent of a neck humbucker.

It's really worked out well. But for the fact I think having mini switches looks nasty and is hard to use quickly I'd be doing this on all my future projects where practical.

So I'm going to sign off on this one for now and start looking at the Goth Explorer. I may have to set this up again as it's a bit rattly, but I want to play it some and let it 'settle'.

I kind of want to continue the 'terrace' theme by making insets for the switches and pots but it's not worth tearing it to bits again just now.

Wear your ply with pride pt. 15

So here I am trying to undo my mistakes.

I dismantled the guitar and taped the body up so I could mark out and drill the new holes for the tremolo bushes. It became immediately obvious they would be dreadfully close to the bridge pickup route. They wouldn't break through, but the route needed for the plate that supports them could easily and without that plate there just wouldn't be enough wood to support them.

So I merrily drilled away.

Once the holes were in place the route for the sustain block had to be moved forwards too.

Then the 'inset' for the tremolo base plate.

Which broke through into the pickup route.

Which also leaves me with a gaping hole on the treble side previously needed for the sustain block.

Also, the base plate inset I'd previously routed by eye using a simple straight edge didn't 100% match up with this new route I did with a template and looked godawful.

So I used a profile bit to add an second terrace to the tremolo inset, it's the only thing I could think of to do to tidy it up.

All the while doing this I was quite despondent about the fact this was probably going to look awful. Still I persevered and put it back together once I'd finished hacking at it with my router.

I was pleasantly surprised, I did seem to have managed to mark out the studs in the right position and the guitar intonated fine.

The great big tremolo inset is a bit odd looking and not something you'd expect on a production guitar but it's not totally awful.

The fact the bridge pickup surround almost butts up to the tremolo baseplate hides the fact the pickup route has been broken into. There's maybe 0.5mm between the two.

So, happy with the fact it's not a total disaster, I've taken the tremolo out again to put some Danish oil in the inset. Maybe tomorrow I'll get it all back together properly, set it up fully and finally play it.

Doing a little jig

So, one of the problems with the Mockingbird was that the nut was much too high. I tried carefully sanding the nut shelf but it wasn't enough and I made shelf convex, which is obviously no good.

There was absolutely no way I could get this flat enough with hand tools, I just don't have the eye or skills.

So I made a jig. This was a bit of acrylic sheet cut up and stuck together so it's snug on the neck and resting on the outer edges of the fretboard. That way it should be parallel with the fretboard and pretty solid. I was thinking about making a clamp for this but just opted for some cable ties as it's not like I'll be using this very often. The jig isn't very pretty as it's been roughly cut, but I wasn't aiming for pretty.

A full size router is quite heavy so I used my Dremel with a basic plastic router attachment. I used another piece of perspex with a decent straight edge clamped to the jig to ensure I couldn't start chewing up the fretboard south of the nut.

Working carefully back and forth this did a great job of gently shaving the nut shelf as flat as I expect to see such things. In the penultimate photo it looks like I've missed a bit, but it's actually a 'tide mark' on the end of the fretboard where there's no finish.

Once I blew the dust off, the new gold nut I'd bought for this guitar fitted perfectly on, I had previously been very hesitant about this job but it's turned out perfectly. I ended up shimming the nut very slightly with some card but I deliberately cut the shelf quite a lot as it's easier to shim the nut than keep going back to take more material off.

With the new nut in place and the guitar restrung, the nut height seems spot on. It's a bit late to play it now but tomorrow I'll have a good play of it.

Of course all this will just show up the fret wear, but I've made progress and perhaps dressing the frets is the next thing I'll learn to do.

Wear your ply with pride pt. 14

I have made a very wrong assumption.

If you were Washburn in the 80s and you were going to go for a minor redesign of the Floyd Rose licensed tremolo, I kind of assumed that despite changing the stud spacing for it you'd leave the other measurements pretty much intact.

I was wrong.

The RR2V is impossible to intonate correctly, the tremolo is simply too far from the nut. I thought it sounded dead off and the string tension felt weird when I strung it last night.

A very quick wave of a yardstick at the guitar shows the studs to be pretty much dead on the 25.5" scale length from the nut. Conventional Floyd Rose studs would be about 25.1" away. You can probably see from the photo of the two tremolo base plates side by side that the knife edges on the 600-T are much further back. Or alternatively, the saddles much further forward.

I can sort of imagine a reason for this. If I've got my mental picture of the tremolo action right this would mean the intonation point moves closer to the pivot point. Which feels like it should make things more stable/subtle but offer less range.

So I've got to undo a load of the work I've done, plug the holes, redrill them closer to the nut and take a router to the top again. I may even need to take a router to the spring cavity underneath.

It could have been worse, the studs could have been too close. Which would have been hard to rectify. Although I'm yet to actually work out whether bringing the studs forward will make them too close to the bridge pickup cavity.

As I've routed an inset in the top this will now be in the wrong place. The only remedy I can think of for this would be to route it deeply with a profile bit to make a 'feature' of it.

Or maybe my vague notion to make a new body using the original as a template just got a step closer. No matter, the whole point of this turd polishing exercise was to get better at shining those turds as preparation for actually laying one of my own.

Wear your ply with pride pt. 13

Well I came home with the machine heads for the RR2V in my bag after a night out so I couldn't resist putting it together and stringing it up.

It's desperately in need of a setup and the intonation is way off, but I think it's looking pretty kick ass. Quite a transformation from the 'barn find' state I got it in.

The return of an old adversary

As the RR2V project is nearing completion I want to get working on some of the others. This Mockinbird was my 'first project of the modern era' and has never been quite right despite a lot of time spent on it.

I wasn't happy with the pickups I originally fitted, so I replaced them with some Kent Armstrong 'Rockers' I bought ages ago. These work nicely and I'm happy with them.

I wasn't happy with the nasty monkey metal tremolo so I bought an adequate quality Korean made licensed low-profile one. This is much better, but now the tremolo route just isn't deep enough for any upwards use.

The neck relief was non-existent, perhaps even slightly negative. I added a little and now it plays much more nicely.

The nut height was excessive. I sanded it carefully and improved on this, but it wasn't enough and the nut shelf isn't 100% flat afterwards.

So I've a few things to attend to.
  • Cut the nut shelf some more and make sure it's flat
  • Fit a new gold nut to match the rest of the hardware
  • Route the tremolo inset in the top of the body out deeper
Tonight I've filled the original screw holes for the nut but cutting the shelf is going to be an interesting proposition. There seems to be little advice online other than 'cut it flat and parallel with the fretboard' and an assumption you have access to a milling machine. Which I don't.

I think I'm going to make a 'jig' which clamps to the neck and will allow me to use a Dremel with router attachment on the nut shelf. It'll need to stay parallel with the fretboard and have some guides so I stay within the bounds of the existing shelf. Using it freehand could result in disaster.

Routing the tremolo inset out should be OK, I already have a template for this and as accuracy is less important I can just use a full size router on that. I will need to acquire a 'guided' router bit though, I don't have one.

Wear your ply with pride pt. 12

So, after a couple of false starts where I damaged the decal I've finally got the finish on the headstock sorted out. The machine heads are on the way and I hope I can actually get this one polished off by the weekend.

Wear your ply with pride pt. 11

Having started to sand back the headstock to remove the logo I decided to have a go at the dirty mark in the wood at the tip of the headstock, which was making it a bit ugly.

It wasn't clear if it was a fault in the wood or dirt so I just started sanding gently. It looked like it was going away so I kept sanding until it had mostly disappeared. This showed up that I hadn't really sanded all the grain filler off the headstock anyway so I've had a serious go and taken it right back to the bare wood. I hope. This has got rid of the nasty mark anyway, which is good.

This has also exposed the 'reverse scarf joint' in the headstock but as I'm happy showing off the fact the body is made of plywood anyway that really doesn't matter.

Having set the new headstock logo to dry I changed the tremolo 'claw' and screws. The old one protruded from the body stopping the cover fitting properly.

I've also wired up the electrics but until I get it back in one piece won't know if the single coils and humbucker are in or out of phase with each other.

Some new black Grover mini-rotomatics have been ordered along with a jackplate so any chance of getting it together this weekend has gone out of the window. This is probably a good thing as it'll stop me rushing the finish on the headstock. I've already had to try a third time with the logo because I went to put the oil over the top too soon and it cracked.

Wear your ply with pride pt. 10

It was good while it lasted.

Last night I put a little oil over the top of the Washburn decal I've made to protect it. This morning I was working on the headstock hardware, mocking up what it would look like with black hardware rather than the chrome the guitar came with.

Sadly the oil wasn't enough to protect the decal and I mashed it up just touching it with the spanner I was using to tighten the machine head bushes. So I'm going to have to go back, sand the headstock again and do a new decal. This will probably stop me getting that much done today as both the decal and the multiple coats of oil will take quite while to dry.

It will definitely be getting black hardware though, it looks much better in my opinion. The black nut is one that came off my neck-through Mockingbird so that can stay in place. However the machine heads are off the Goth Explorer and are actually mid-size Grover Rotomatics rather than mini-Rotomatics. They look the same from the front but have the 'tag' in a slightly different position and I don't want to drill the headstock if just getting some black mini-Rotomatics would prevent this.

I'm tempted to steal the mini-Rotomatics off the MG440 and break it for parts, but I really should finish that off and chuck it on eBay. Stealing the hardware starts the slippery slide into it being unplayable and just taking up space.

Perhaps I ought to do that while the RR2V headstock dries.

Wear your ply with pride pt. 9

This evening I started putting the pickups back in the guitar but before I passed the wiring through, shielded the control cavity with some aluminium foil tape. It's been done in two pieces so I'll use a solder tag to make a good positive earth connection with it.

Once I did this I messed about with putting a logo on the headstock. As I've no artistic skill whatsoever I took a Washburn logo that Brad Brunette from the Washburn forum had made by scanning the headstock of his Dime Stealth and removed all the Dime related stuff. Quite how he held the headstock of a guitar on a flatbed scanner I don't know, but it's a nicely done logo in a decent resolution. It's the 90s 'Frankenstein' style Washburn logo as seen on the Steve Stevens signature models. Which I prefer to the modern script logo or the 80s angular one the guitar started with.

I pasted this in a variety of sizes into a Word document, printed it out and offered a couple up to the guitar. It seemed to look OK so I printed the same thing out onto some 'waterslide' laser printer decal sheets I bought some time ago for exactly this purpose. These are a little bit flaky but most of the logos came out OK.

So, in a throwback to my childhood of making plastic model kits I soaked the logo in warm water and slid it onto the headstock. I messed the first one up, managing to crease it but as I'd printed a whole sheet of the things just cut out another one and went for it.

I reckon the end result looks kick-ass. Although I really am going to have to swap the hardware to all black, the chrome just looks too washed out on a blonde guitar.

Wear your ply with pride pt. 8

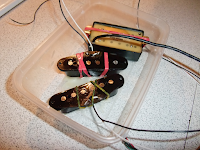
So, in line with the general restoration I'm doing I resolved to tidy up the rather scruffy original single coil pickups. They sounded decent enough and look well made but they're grotty and lacking covers. I could just buy some new ones but that's not the point of this exercise. I positively enjoy turd polishing.

My friend Nick keeps bees, so I blagged some beeswax and added it to the paraffin wax I used last time to pot pickups. Pure paraffin wax was a little hard once set and is supposedly prone to flaking because of this. I've ended up with about one part beeswax to two parts paraffin wax.

Potting pickups isn't exactly rocket science, you basically melt the wax, dunk the pickup in, leave it to infiltrate the bobbins/cover then take it out and leave it to cool. The only thing you do have to be careful with is not to overheat the wax as it can 'flash over' and catch fire suddenly. The simple way to keep the risk of this low is to fill a pan with water then place another container inside it which you melt the wax in. Keep the heat gentle, don't rush and don't let it boil dry. This simple 'boiler' means the wax doesn't get stupidly hot. Just be careful and don't blame me if you ruin your vintage 50s PAFs. :-)

While the wax was melting (it takes a while) I put some new longer wires on the pickups, then gently brushed off the worst of the muck and fitted some new covers. I stuck some rubber bands round the covers to hold them on and once melted dunked them in the wax. I also stuck a plain cover on the Iron Gear humbucker I plan on using despite it being as new.

After leaving them to cool you rub off the excess wax. Be careful not to press on any exposed coil wire, especially on single coils where it's normally visible on the base plate. This hair thin wire is very easy to break DAMHIKIJKOK.

With most of the wax rubbed off the exposed areas I've got a tidy looking set of pickups ready to go into the guitar. The microswitches I've ordered have turned up and the finish is going quite nicely so I reckon I might be able to reassemble things over the weekend. The only bit I'm not so sure about now is the jackplate, it's tired and cracked but a non-standard size. I may have to fabricate a new one and my record on cutting small pieces of metal square and tidy isn't great. I did think about replacing it with a strat style angled inlet oval but don't fancy hacking the body about in that area.

Wear your ply with pride pt. 7

So, I'm at the frustrating stage where I want to put the guitar back together but getting the finish sorted out is taking a while.

I decided the body was too shiny and the oil had too much dust in it so I flatted it down with wire wool. This just seemed to put a load of scratches in it despite using really fine wool. More scratches than I've noticed from using fine sandpaper.

So I attempted to buff it and this just lead to having the scratches stand out even more.

Now I'm putting more Danish oil on and it's coming up nicely but progress is slow and the oil is taking a while to dry as it's quite built up now. Perhaps too built up.

The chipped black headstock offended me, so I've sanded it back and I'm doing the same with it. It won't look great as the wood is pretty grotty. Now it's plain wood the fiddler in me wants to fit black machine heads and nut. As I have some fitted to the repaired MG440 I'm tempted to send it to the knackers yard and steal them. This sounds a bit extreme but I'd spend as much buying a set of black Grovers, nut, string retainer and tremolo as I'd get for it on eBay.

All the electrics are going to be replaced as they were nasty. I've got some mini-switches on the way and am tempted to wire the pickups up serially rather than the usual parallel arrangement, at least for the single coils.

Indie #29 - 'Shape custom double cut' wine red

So, there's an element of coming full circle here. My first Indie was a 'double cut semi-hollow shape' and almost 30 guitars later here's another one. Also, the first was an 'orphan' i.e. a b-stock item straight from Indie and so is this. I never actually found where the obvious blemish on the first one was, but this has a little fault in the neck binding and has obviously been very lightly used, perhaps for demos.

This is a new for 2010 model, taking the semi-hollow double-cut shape body and this time going with humbuckers (with fetching zebra bobbins) rather than P90s and adding a new control layout with two volumes and master tone. They've also upgraded the bridge to a fully adjustable Tonepros item instead of the old fixed-intonation one.

These changes add a little more flexibility, refinement and by moving to humbuckers perhaps a broader appeal. Total Guitar certainly seemed to like it and there's a pretty decent review here.

Adding the extra volume control has used up the position previously used for the pickup selector, so they've moved this forward to the lower horn. I really like this position, it's where it is on my Indie Shredder and on the Washburn NX3. It's not a particularly common position for it, but I think this really works.

There are lots of other little improvements and tweaks which seem to be aimed at making the guitar stand out in a crowded field, while not really costing a great deal to do. The maple neck now has a clear satin finish, the fretboard is now bound and there are trapezium inlays, much like you'd expect on a Les Paul. Although I always quite liked the Indie logo at the 12th fret and it looks particularly classy on the Shape natural.

In play it does the usual thing pretty nicely. Twin humbuckers and a set neck is well trodden territory but unless my ears deceive me the sound chamber and maple neck perhaps make it slightly brighter than my other similar Indie Shape guitars.

Both volume controls have been fitted with a treble bleed circuit, which really helps keep things clear when rolling down the volume, especially on the neck pickup. This was done on my Shape Floyd as well, so I guess Indie have started doing this as standard.

Wear your ply with pride pt. 6

Right, that's the routing of the tremolo inset done. This was done semi-freehand using a straight edge to run the router round an outline drawn partly with the tremolo base and partly with a router template.

Ideally I should have used the router template but it's for an original style Floyd Rose, not a Washburn tremolo with slightly different shape base plate. Also I've yet to pick up one of those router bits with the guide bearings for using with the template.

Once done I splodged a little black paint on the bare wood to tidy it up.

I also stripped the hardware off the neck as a prelude to sanding the finish off the face of the headstock. I might tackle this later tonight.

When the hardware goes back on I need some kind of string guide for it. As mentioned before, the relationship between locking nut and machine heads means the top E string gets cut as you tighten the locking nut, unless you carefully guide it in the nut while you tighten it. My teal EC29 has a pattern of screws in the headstock to guide the strings but all my other late 80s Washburns with the pointy headstocks suffer from this. I'm not sure a conventional Floyd Rose string guide will work, the headstock is pretty narrow.

Wear your ply with pride pt. 5

So today I flatted the top down gently then roughly stuck the guitar together and strung it. The bridge pickup is just wired straight to the jack socket so I could tune it and give it a play.

I'm very pleased with how it's coming along. I think it looks cool and one of the reasons I bothered rescuing it is that it's nice to play.

The Washburn humbucker was falling to pieces, much like the one in my G2V, and is pretty nasty anyway so I've used an Iron Gear 'Sledgehammer' I had kicking around following removing it from one of the KC90s. This is a pretty decent sounding cheap 'hot' pickup and certainly sounded the part when I had a quick go. The original single coils are OK but lacking in covers so I'm going to spruce them up with new ones.

Sadly, I'm going to have to rip it all to pieces again. As I suspected from when I played it before stripping it down there's simply not enough clearance between the tremolo and body for my liking. I could shim the neck to put a little angle in, but I like everything to be snugly fitted. Besides this is definitely a 'beater' project expressly bought for this and I'm working on it because I like messing around with guitars.

I suspect I'm going to take the paint off the face of the headstock too, so it matches the body. It's chipped anyway.

Wear your ply with pride pt. 4

I reckon I've finished putting oil on the RR2V body now.

As ever it's hard to capture simply by chucking something on the kitchen table and taking a quick photo, but the oil has given it a fairly decent golden colouring and enhanced the contrast of the grain.

While doing this I've managed to trap a fair bit of lint and dust on the surface and it's perhaps overly glossy so I've quite a bit of buffing to do to get rid of this.

Nevertheless I'm quite happy with how it's going.

Wear your ply with pride pt. 3

This evening after getting back from my regular Sunday practice session, I did a bunch more sanding of the RR2V body then wiped the dust off with some white spirit.

Once it was dry I stuck some plain Danish oil on the top. It seemed to suck this up pretty quickly so I've gone ahead and done the whole body a couple of times. The top seems to be going quite a nice colour although experience shows this will be lighter once it's fully dry. Putting the oil on the sides is really helping to bring out the contrast between the layers.

I'll keep at this the next couple of days so it should be ready for reassembly by the end of the week.

Wear your ply with pride pt. 2

I've made more progress with the RR2V. It was fitted with a Washburn 600T tremolo which uses non-standard spacing (71mm vs 74mm) for the studs. Not only was this in poor condition and missing a fine tuner, I actually bought this guitar to rob for parts anyway. So I set about moving the studs out to the standard spacing.

First up I drilled out the old holes to 9mm.

Then plugged it with some 9mm dowel and left the glue to dry overnight. No attempt was made to make this pretty as it was only there so the drill had something to bite into.

Using a Floyd rose routing template I bought a while back, some guide lines drawn out from the neck and a bit of careful reckoning based on the old filled holes I marked up the new stud positions.

As the new studs are larger almost all the dowel got drilled away. This was a bit nerve racking as it's the first time I've had to mark up a bridge on a guitar, rather than just replacing some old studs.

With all this done, I quickly stuck some components in the body to get a feel for what it will look like. I'm not 100% sure about the very light colouring. Natural Danish Oil will darken it slightly but I'm tempted to use the 'mahogany stain' oil I have. I used this on the back of the KC90V I refinished so I've some idea what kind of colour it will come out. On that I roughed it up to do a kind of relic look, which didn't work too well but it should be OK if I put it on flat. I may try one coat of plain oil before committing to the darker oil as once it's on you can't really go back.

I also did lots and lots of sanding. I'd missed the odd spot of black paint but the body is covered in a very tough and thick layer of clear grain filler. It's taken literally hours and it's still not all gone. I'm going to have to go over it a little more before I can start with the oil. Where the corners where scuffed I sanded them until they're approximately even. I also rounded the body edges a little more to bring out the contrast with the dark ply underneath the light top.

Doing this work has shown up a few small things I need to get to finish this off, although nothing that will really stop me making progress. I also need to decide whether or not I want to route out underneath the tremolo baseplate to give it more upward range. I won't use this much but clouting the tremolo into the body always grates.