AKA "How to re-string and set up a Floyd Rose tremolo"
My friend Mik's son Kai has a lovely ESP-LTD Alexi-600 in the unusual pink sawtooth design but hasn't played it for a while because it needed setting up. Like a lot of people who own guitars with Floyd Rose bridges, he'd changed strings and found it wasn't right afterwards but didn't know how to sort it out. Kai was going to come along and watch me do this, but couldn't make it in the end so I've decided to stick it on my blog instead.
I'll mention some tools and sizes here, these are specific to the guitar I worked on so use some common sense before wading in. Always use acceptable quality branded tools, they don't need to be Snap-On, but don't use chewed up screwdrivers made of cheese.
The first picture shows how it was when I got it. The bridge was so poorly 'floated' that it was pulled right up, like you'd used it to divebomb the guitar.
I always work on a table covered with an old folded bedspread to protect the guitar and a roll of cloth under the neck by the headstock to it's not resting hard on it.
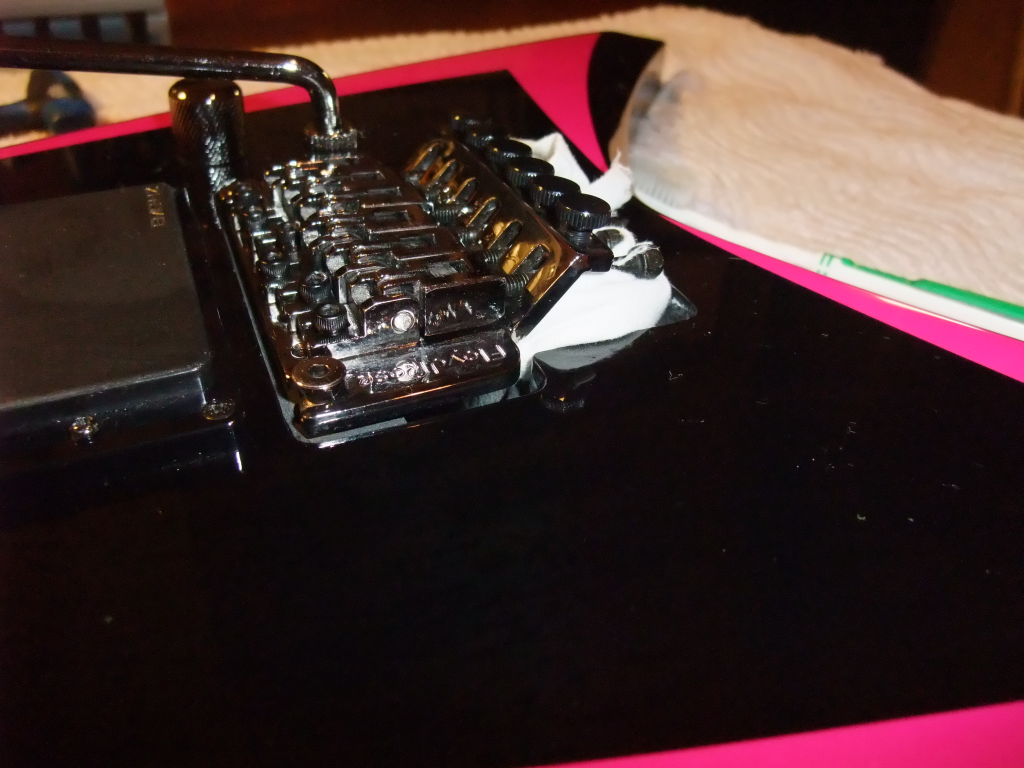
Start by taking the old strings off one at a time. Wedge a little bit of wadded up cloth under the back of the bridge so that as you slacken the strings it won't mark the body.
Undo the locking nut with a good quality 3mm hex key. Slacken the strings off one at a time using the tuners until the string goes completely loose. A basic 'string winder' like the yellow plastic one in the photos helps. Start with the high E. As you loosen the strings the remaining ones come under a lot of tension so it makes sense removing the weakest string first.
Once a string is loose, undo the locking bolt at the bridge using a 3mm hex key and carefully remove the string while trying to keep the sharp end away from the guitar so you don't scratch it. Once you've removed the string gently tighten the locking bolt again to stop the clamp blocks falling out, which is annoying.
After all the strings are off I use this as a time to make sure the machine heads are firmly attached to the headstock. It seems not uncommon for either the bush or screw on the back to come slightly loose. They may not even have been tight from the factory. With string tension this may not be obvious but with no strings you can soon see if any are loose. Here I used a 10mm spanner on the bushes to check them.
Do not use pliers you Neanderthal.
Also, turn the guitar over and remove the cover on the back of the guitar which exposes the tremolo springs. You'll need to adjust them so may as well remove it now before you have strings flailing about. If you didn't tighten up the bridge clamp bolts this is when all the clamp blocks fall out.
I also use this as a time to clean the fretboard and guitar body with a damp microfibre cloth. It is much easier to do this with no strings attached.
Do not get the fretboard soaking wet.
I then string the guitar. On something with a Floyd Rose I do this 'backwards'. I leave the string ball end on and pass the string through the hole in the machine head down to the bridge before clamping it. With the low wound strings you'll need to cut them back, removing the plain core that's exposed on most sets.
Do one string at a time and clamp it at the bridge end. There's no need to do up the clamp bolts massively tight, just firmly. If you're heavy handed it's possible to snap the bolt or strip the thread which is bad. Again using decent tools helps, a 't bar' style hex key with a moulded handle like I've used means you get much more feel than a crummy little short hex key.
As I do each string I put a little tension in it so it doesn't flap about. My recipe for stringing guitars is to hold the string onto the fretboard near the nut with my first finger then hook up some slack with another. This isn't very well explained, but the picture of my pudgy hand to the left should make it clear.
You don't need much slack to secure it at the machine head especially with the low strings, pull the excess through until it looks roughly like this and start to turn the tuning peg, it should 'bite' fairly easily because you're keeping tension on the string. You'll need slightly more slack for the higher strings, particularly top E.
My favoured string winding technique is to pass the string over the loose end on the first wind then below for the subsequent ones. This grabs the loose end, in my opinion making it less likely to unwind and means you can cut it almost flush. Again I've not explained that terribly well but I hope the photos make it clear.
Once you've done all six strings we can get onto the real business of setting up the tremolo. Don't cut the ball ends off the strings just yet, in case you've misjudged how many windings were needed. In extremis you can loosen the string off, push a little more through then tighten it again. Once you've done this a few times you'll get a feel for how many windings are needed.
What we're aiming for on a flat top guitar with a shallow neck angle like this is for the base plate of the tremolo to sit parallel to the body. Get the cloth you've wedged under the bridge set so that the base plate sits roughly level before you bring the strings fully up to tension. You may need to use the tremolo arm to lift the tremolo up and move the cloth around.
One string at a time, starting with low E and using an electronic tuner, bring the strings up to tension. When you get up to top E, low E will have slackened off again, so bring them all up to tune again several times.
The strings will need stretching. I start this by grabbing hold of one and lift up until the guitar
just starts to lift. I then let go so the string snaps back. Do this several times.
If at any point the tremolo base plate starts to lift so it's no longer level, turn the guitar over and tighten both the screws that secure the 'claw' the tremolo springs hook onto. Only use about 1/8th of a turn at a time.
If these screws are already obviously screwed all the way in you'll need another tremolo spring fitting. Loosen the screws off a few turns, use the tremolo arm to move the sustain block closer to the claw and then fit the new spring. I do this by fitting the 'hook' end of the spring in the sustain block then grasping it firmly and pushing the 'loop' over the claw. You need a firm grip to do this, but it can be done. You can use a special 'spring puller' or improvise with a screwdriver but it's easy to slip and damage the guitar. On Kai's V I had to add a third spring.
If an extra spring is too much but you want more tension from them, you can run them at an angle, like in the photo on the left. It also looks cool. :-)
The reverse process is also true, if the strings are fully at tension and the tremolo is still pulled down hard onto the cloth you need to loosen the tremolo springs underneath and perhaps remove a spring. However I've found it is always easier to tune 'up' to a pitch with a Floyd Rose than 'down' to it so if the springs are obviously too tight I'd straight away take a fair bit of tension off them.
This is a dull repetitive process. The Floyd Rose relies on an equilibrium between the springs, strings and neck. As you change one, all the others move. So you'll need to keep retuning all the strings, checking the 'float' of the tremolo to see if it's level and then doing it again.
And again.
And again.
Eventually you'll get to the point where you can remove the cloth and the tremolo will sit roughly level. Go through this process with the cloth removed again until the tremolo is perfectly level. It may be worth leaving it a few days before you do this, as the neck can need to 'settle' a little if you've changed string gauge or tuning.
Now we need to set the action. I do this by putting a capo on the first fret and then measuring the height of the strings at the 17th fret. For this I use a small hex key and slide it along the top of the fret. I then adjust the height of the bridge studs using a 3mm hex key until it just touches the small hex key, with maybe a little extra clearance on low E. My usual starting point is a 1.5mm hex key. People have different preferences for this, but measuring it like this at least means you can be fairly scientific about it.
If you've had to adjust the bridge height more than a tiny amount, it will have changed the distance between the nut and bridge slightly and mean you need to float the tremolo again. As tremolo float also affects bridge height this is a repetitive process as well, but you probably won't need to do this more than a couple of times as the amount things are moving now is quite small.
When you've done all this and are happy, have a little play of your guitar. This also helps with a final stretch of the strings. If it feels right, now is the time to cut the loose string ends off. I do this very close so they're almost flush with the machine head, making it less likely you'll stab yourself with them.
With the strings cut off, we need to finally lock the Floyd Rose in place. Look at the fine tuners on the bridge and one at a time adjust them so they're halfway through their travel then retune at the headstock with the normal tuner. Once you've done all the strings, refit and tighten the clamps on the locking nut. Again this doesn't need to be brutally tight, just firm. Doing this may take the guitar out of tune slightly.
From now on all tuning must be done with the fine tuners on the Floyd Rose, unless you first undo the locking nut. It may seem blindingly obvious but people forget.
With new strings, they'll continue to stretch unless you've made a good job of pre-stretching them when fitting them. You may find you run out of adjustment on the fine tuners pretty quickly. Just undo the locking nut, reset the fine tuner to the middle of its travel and retune. Eventually it'll settle down.
Also, refit the cover over the tremolo springs before you forget and/or lose it.
So that it for part 1, the next part is to set the intonation.