Showing posts with label pickups. Show all posts

Silver or red?

As well as the Reflex Reds I have there's a set of HSS Silvers. These are already mounted on a scratchplate but it's slightly oddly shaped and seemingly has been cut for a Floyd Rose route. They do however have the advantage of already being fully wired, with the correct center-detent pots.

So I ordered a generic HSS scratchplate and I'm considering which set to fit. I think it's going to be the Reds as they can go in the original scratchplate but I plan to use a connector block under the plate so I can swap them easily.

I also ordered a new bridge as I want to use the vintage style bent steel saddle one for the 'Dave Murray' project. I decided to go for a Wilkinon WV2P with a steel block, there's one of these on my Custom Shop Indie IPR and it's a lovely tremolo.

With the various bits dropped into the body I'm very happy with how it looks and as expected the tremolo is a perfect fit.

Unfortunately my drill press, which is pretty cheap and nasty, doesn't have a deep enough 'throat' for me to be able to drill the holes for the new bushes. Which is a real stumbling block as I don't want to drill this freehand, I'd just screw it up. I'll have to see if I can borrow the use of a bigger drill.

Resurrecting some Reflex Red pickups

When I originally bought my Washburn EC29 in the early 90s, it came fitted with Reflex Red pickups.

These were English made active pickups with a variable active mid boost and I suspect an aftermarket job on my guitar. The EC29 came with an active mid boost as standard but from what I've seen this was a Washburn thing and all the photos I've seen have the pickups branded up as Washburn.

I was always a fan of these pickups and they seemed very high output to me. Sadly they stopped working and the active box seems to have a broken wire as if you wiggled cabling it would occasionally spring into life. Being a circuit potted into a small box it'd be very hard to fix this.

To get my guitar usable I fitted it with some Kent Armstrong pickups and a simple passive setup, saving all the Reflex stuff and carefully storing it in a box.

I started keeping an eye out for Reflex pickups on eBay and sorted myself out a couple of sets that I could maybe use to resurrect the originals. However in the meantime I got enthused about Seymour Duncan active pickups and rewired the EC29 with some Blackouts.

So I've now got an assortment of Reflex bits kicking around doing nothing. One of these is a strat set of three single coils and I've decided to have a go at fitting them in the mahogany strat. These were rather nastily wired up with great blobs of solder like somebody has re-used the pots multiple times. This is understandable as they use 10k centre detent pots which people fiddling with guitars aren't going to have kicking around. These pots also have tiny plastic shafts with little collets used to allow you to fit standard guitar knobs.

I've taken this set, desoldered it carefully, taking note of how it was connected and fitted it to the original scratchplate from the mahogany strat. Now I've ordered some 10k pots to finish off the job and once these arrive I'll have a go at wiring it all up.

At some point I found these nasty scanned faxes of the original Reflex wiring instructions on the Internet and it looks to 100% agree with the wired up sets I have. I'll be using the second setup with separate mid and treble controls. Sadly the pots I have ordered aren't centre detent but they'll have to do.

I have a couple of HSS sets as well as this and may think about fitting them into something else if this works out. However my cup runneth over with active pickups so I suspect these will sit in the box with the rest of my hoard.

The wonder of the scratchplate

I'm not actually a fan of scratchplates on guitars, but boy do they make projects easy.

I quickly whipped the old pickups/controls out and started work on the replacements. As the Dave Murray strats have chrome pickup surrounds, this clashes with the volume control on the scratchplate I bought. So I used a round file to turn the relevant hole into a slot, neatly solving the problem.

As it was a fairly cheap scratchplate, there was only shielding on the control section. I removed this and stuck aluminium foil over the whole thing. This came off a roll of adhesive foil I found kicking around at work, I think originally intended for sealing air conditioning ducts. Once trimmed round with a stanley knife it was quite tidy.

Then it was a piece of cake to stick the pickups in and wire it all up. I'd bought a pair of cream Artec humbuckers with a hot bridge pickup and vintage output neck one in an attempt to mimic the Dimarzio Super Distortion and PAF combo in the original. For the single coil I used one that I'd removed from my black Indie Super-T ages ago, fitted with a cream cover.

The Artecs were only cheap but nicely made and with the guitar all back together sound really decent. I wheeled it out for some practice today and it's a really playable fat strat with a chunky neck and very deep tone, not that 'stratty' at all.

In fact after working on this I'm convinced the body is actually mahogany, not the usual alder or ash. It weighs a ton and the grain looks how I'd expect mahogany to. Although I'll be the first to admit I'm useless at identifying wood grain. Chuck in a Wilkinson trem with great big steel sustain block and the aforementioned humbuckers then I can sort of see why it sounds like it does.

So now I've done the easy bit. Next I have to rip it apart and refinish the body which will be my first experiment with Nitrocellulose.

Wear your ply with pride pt. 8

So, in line with the general restoration I'm doing I resolved to tidy up the rather scruffy original single coil pickups. They sounded decent enough and look well made but they're grotty and lacking covers. I could just buy some new ones but that's not the point of this exercise. I positively enjoy turd polishing.

My friend Nick keeps bees, so I blagged some beeswax and added it to the paraffin wax I used last time to pot pickups. Pure paraffin wax was a little hard once set and is supposedly prone to flaking because of this. I've ended up with about one part beeswax to two parts paraffin wax.

Potting pickups isn't exactly rocket science, you basically melt the wax, dunk the pickup in, leave it to infiltrate the bobbins/cover then take it out and leave it to cool. The only thing you do have to be careful with is not to overheat the wax as it can 'flash over' and catch fire suddenly. The simple way to keep the risk of this low is to fill a pan with water then place another container inside it which you melt the wax in. Keep the heat gentle, don't rush and don't let it boil dry. This simple 'boiler' means the wax doesn't get stupidly hot. Just be careful and don't blame me if you ruin your vintage 50s PAFs. :-)

While the wax was melting (it takes a while) I put some new longer wires on the pickups, then gently brushed off the worst of the muck and fitted some new covers. I stuck some rubber bands round the covers to hold them on and once melted dunked them in the wax. I also stuck a plain cover on the Iron Gear humbucker I plan on using despite it being as new.

After leaving them to cool you rub off the excess wax. Be careful not to press on any exposed coil wire, especially on single coils where it's normally visible on the base plate. This hair thin wire is very easy to break DAMHIKIJKOK.

With most of the wax rubbed off the exposed areas I've got a tidy looking set of pickups ready to go into the guitar. The microswitches I've ordered have turned up and the finish is going quite nicely so I reckon I might be able to reassemble things over the weekend. The only bit I'm not so sure about now is the jackplate, it's tired and cracked but a non-standard size. I may have to fabricate a new one and my record on cutting small pieces of metal square and tidy isn't great. I did think about replacing it with a strat style angled inlet oval but don't fancy hacking the body about in that area.

Some progress with the Mockingbird

So, flushed with the success of setting up the RS8V I attacked the iffy Mockingbird. I slackened off the truss rod to give some relief then lowered the nut height a little. This time I attacked the nut shelf as it was more substantial than the RS8V and made of wood rather than weird plasticky stuff.

This has really helped and made it much more playable. I'll have to take a bit more off the nut height but I've decided the monkey metal tremolo really has to go. I'll order up a new one and do both at the same time.

With it approaching playable I went for the electrics. I ditched the neck P90 and Epiphone bridge then fitted a matched pair of Kent Armstrong 'rockers' I bought ages ago cheaply. I had written off the idea of using them in this as the bridge wasn't bought as F-spaced but when I actually measured it's actually pretty close to it. In my usual fashion I stuck in some push/pull pots and wired it for coil tap. Given some 4-wire pickups it's almost rude not to.

With it all back together it's a lot closer to what I wanted from the Mockingbird when I started modding it, but there's still a way to go.

EC29 rewire - again

Today I finished up another rewire of my teal EC29. The active Reflex pickups that were in it when I bought it failed a while ago and about a year back I put in a Kent Armstrong Motherbucker and cool rail to get it playable.

I've now swapped to active Seymour Duncans, a 'Blackouts Metal AHB-2' in the bridge position and a 'Blackouts Single AS-1' in the neck (well middle really) position.

As they're both switchable output pickups I made up my own quick connect leads so instead of just placing a jumper on the pickup I could switch the output from normal to hot easily. The multicore shielded cable I used was quite thick so I had to route out a little channel in the back of the battery compartment for it to have any chance of fitting. It was always stupidly tight anyway so this was kind of necessary before I started.

This, combined with a couple of busy weekends and general laziness meant it's taken me a couple of weeks to finish the job.

I used a Dimarzio double wafer switch and wired it up so I got the following options in order.

Bridge hot
Bridge
Bridge & Middle hot
Middle hot
Middle

I did think about just using a 3-way switch and push-pull pots to do the hot/not switching but fancied trying this.

Wired up like this means there's a clear progression in output as you use the switch from 'moderate single coil' to 'stupid high gain death'.

So far I'm quite happy with this and think it complements my other EC29 with the passive SSL-2/TB-4 Seymour Duncan setup well. It's all a bit metal but then so is this guitar.

Goodies

Courtesy of eBay I have built up a little stash of Seymour Duncan Blackouts active pickups. I've already got some in my Rhoads and I reckon I prefer them to EMGs. They seem to change hands for less than EMGs too, which is a bonus.

This is a neck/bridge set, a strat set and a single bridge. The middle and neck strat ones are the same pickups.

I'm thinking I'll make up an H/S set using one of the singles and the bridge AHB2 pinched from my Rhoads to go in one of my EC29s. The plan is to use a five way 'super switch' to toggle the 'high output' jumper on the two pickups in the intermediate positions and make it a little more versatile than just setting everything on 11 all the time.

The odd bridge (which is a bit scuffed) will go back in the Rhoads.

I'm not quite sure what I'll do with the matched pair, they were sort of bought on spec. because they were cheap. I could do another HSS set although something will end up with a bridge pickup in the wrong position if I do.

Dean #1 - 'Baby ML Dean from Hell'

AKA piece of cheap Chinese tat #1

I had been discussing with a friend which 'iconic' guitars I'd like to own a replica of and the Dean from Hell was one of the obvious ones. I'm not a Dimebag fanboy but I did really like the Cowboys from Hell era Pantera. I lost interest around Great Southern Trendkill.

There was no way I was going to pay what Dean were asking new for the official full size replica, even a Chinese one, but this came up very cheaply on eBay and I thought it'd be a bit of fun. It's a 3/4 size ML body but with a standard scale length and decked out as a DFH replica.

Except as it came, admittedly secondhand, it was shit. The neck was bowed and the pickups awful. I started tinkering with it and found the truss rod completely loose in the neck. So I tightened it up and fixed the bow.

Even with this done the intonation and action were all over the place and with a bit of setup I've improved it. However the bridge simply doesn't offer enough adjustment to get it spot on. It seems to be forced forwards by harsh angle of the strings as they go into the body ferrules, perhaps down to the fact it needs to be set quite high. I think I may have to buy a 'Nashville' bridge to work around this this. Although tighter fitting bridge studs may help too, it's all rather sloppy.

Speaking of the ferrules, it was missing one when I got it. The seller mentioned this so I was expecting it. The reason it was missing is that Dean didn't bother to fix them securely and it must have gone pingfuckit when restringing. Thanks Dean. They'd also used the same style of 'cup' ferrule for both the top and bottom of the body, which is a bit rubbish as the string presses into the side of the ferrule and body of the guitar as it emerges. I managed to get some suitable replacement ferrules from CH Guitars. When I restrung it I glued the ferrules all in and turned the top ferrules around so the strings emerged cleanly from the hole in the middle, keeping it away from the body and at a very slightly shallower angle to the bridge.

Next up, even if the pickups were OK, and they're not, they simply didn't fit the replica theme. They were two bog standard black open coil humbuckers. To be a Dean from Hell it has to have a zebra pickup at the neck and a Bill Lawrence style blade one at the bridge.

I've now replaced the original pickups with a GFS zebra neck and Axesrus blade at the bridge. Not only do they sound better, even though both were cheap as chips, but it now looks more the part. It did have a Bill Lawrence USA L500XL at the bridge for a while, which is the right thing for a DFH, but that's a stupid size. The special surround didn't cover the route in the body and in a standard surround the L500XL flapped about.

The lightning bolt design is a nasty decal but from a distance it looks kind of OK. It now plays averagely for a cheap guitar instead of barely at all. The neck has a pleasant satin finish and some nice grain but the frets are a tad uneven and sharp at the edges. I may use this to practice working on fretboards.

Unless Dean have improved Baby MLs since this one was made (2007) I wouldn't recommend buying one unless you're willing to spend some time sorting it out. There are much much better budget guitars around. Luckily I positively enjoy tinkering with guitars and see things like this as a challenge.


Update: I've just played this for about 90 minutes and that bridge pickup is great, especially since it was only £10 because it was a second. I reckon it's better than the Bill Lawrence.

Goodies

I bought a small batch of goodies from Axesrus this week as some of my projects need odd bits.


  • Pickup covers, locking nut clamps and tremolo arm for the RR2V 
  • A B2 tune-o-matic bridge for the Indie Target Les Paul, as it's slightly narrower than the usual metric item. The one on there isn't a great fit, I'm hoping this will be better.
  • A tremolo arm for the G2V
  • A Dimebucker-esque rail pickup for the Baby Dean. It's actually got a Bill Lawrence USA L500XL in there now which is more authentic but that's a stupid size. The special BL USA ring doesn't fit the body but if you put the L500XL in a normal ring there are large gaps round it.
  • Some strap button felts.

Washburn #3 - 'EC29 Challenger' red

EC29s simply don't come up very often so when this one appeared on eBay I thought hard about picking it up. Then I thought about it the second time. Then the third. Finally when I think it had been on four times I bought it.

The reason for my reticence was that somebody had taken a chisel to it. The pickup cavity has been enlarged and the bridge pickup moved forward. There are also a few random holes in the top. It's been suggested it once had a Roland Hex Midi pickup fitted.

When I got it I found the pickup was barely supported. There were a couple of pieces of hacked up pencil roughly glued into the corners of the hole and the surround was kind of flapping around.

So I carefully tidied up the hole, cut a block of wood to fit and glued it in place. This isn't the tidiest of jobs but at least it's now sound and allowed me to put the pickup back in the original position.

It came with a Gibson bridge humbucker and unidentified single coil, the original active electronics having been long lost. The whole thing was very buzzy and rubbish so I immediately tidied it up and used it for a bit.

I was most impressed with the Gibson pickup it had a great hot-classic tone. After playing it a while I was still annoyed by the slightly iffy selector switch and took it apart to fix this. Unfortunately in doing so I killed the pickup, the tape protecting it was broken and I guess I damaged the windings manhandling it.

A little messing around trying to resurrect the pickup went nowhere so I ripped it all out and started again. This time I stuck in the Seymour Duncan JBJ and single coil that came in my KC90. I also did a 'progressive coil tap' circuit and it's now a nice versatile guitar.

I recently got an original Floyd Rose quite cheaply, which is nicer than the Washburn 600S tremolo it came with so I've swapped it in. I need to go back and sort the cosmetics out, I'm thinking of making up a scratchplate to cover the damage.

Washburn #2 - 'KC90 V' natural

In modern times, Washburn have contracted out the bulk of their manufacture with only the 'custom shop' models being made in the USA. In the early 90s, the Chicago series were their standard superstrat offering and mostly made in Korea. Nowadays they're not in the slightest bit desirable so if you want a good quality cheap superstrat one of the KC models would be right at the top of my list. The electrics and pickups are even of a decent quality.

The two top models, the KC90 and KC100 were made in Japan. This was in the factory which made early 90s 'Professional' Jacksons, renowned for being made to giant-slaying levels of quality and playability. Unlike the Jacksons this isn't widely known so the KC90 can be had rather cheaply sometimes. I managed to pick this up for £90. The KC100 is similar but with a through rather than bolt-on neck and is quite uncommon.

So, the KC90 comes with good quality Japanese hardware, Washburn branded Gotoh machine heads, Washburn 600-S tremolo which is actually a Takeuchi TRS-101 and fantastic build quality. The neck on mine feels exactly like the one on my Jackson Rhoads EX Pro, which would have come from the same factory. It even has the same slightly too close together inlays at the 12th fret.

Last but not least you get genuine Seymour Duncan pickups. Mine came with a JBJ at the bridge and 'classic' single coil in the middle position. Originally the neck pickup would have been a Duncan too but somebody had replaced it with a cheapo Artec mini-humbucker at some point. The electrics were all scratchy too, but such is the peril of of 15+ year old guitars.

When I got this it had a badly chipped metallic blue finish on the body. So I stripped it back to the wood and did a Danish Oil finish. this was my first go at refinishing and it's not perfect but is adequate.

I also rewired it with a Kent Armstrong Motherbucker at the bridge and two Cool Rails in the other positions. I stole the Duncans from it for one of my EC29s.

If I see another one cheap I'll buy it. They're the perfect base for a 'superstrat project' as you're starting from something decent.

New year, new project

OK, so I actually started this on New Years Eve but I finished it up today.

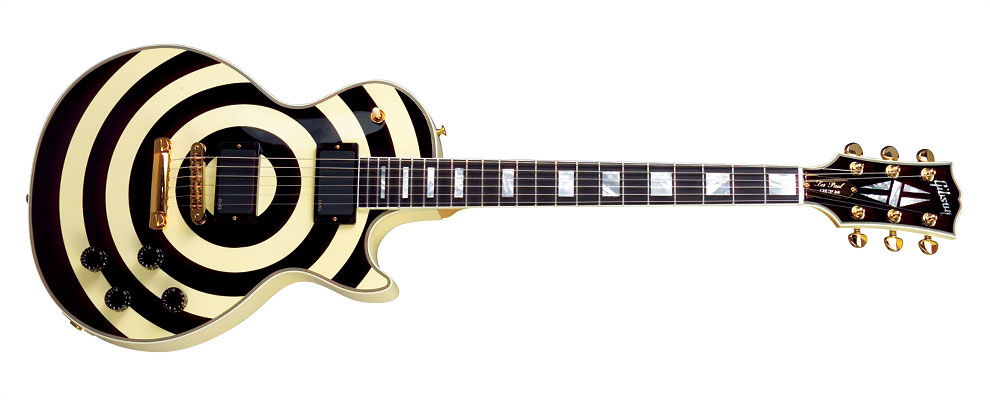
When I bought the Indie Target Les Paul I thought it may be amusing to make it closer to the Gibson Zakk Wylde signature models as I had a lot of the parts needed, most notably an EMG Zakk Wylde Pro set I bought for something else long before this guitar fell into my hands.

I started out with this...


I was aiming for this...


...and ended up with this...


...which I reckon is as good as an approximation as I'll get with some simple hardware changes.

The EMGs are interesting to play with and do the ridiculous gain/sustain thing that the Seymour Duncan Blackouts I've got in my Jackson do. Although they're perhaps slightly less OTT. I'll need to do a back to back comparison at some point and also throw in the Indie active pre-amp I have in the Extreme Plus.

Indie #9 - 'Standard 2000' Natural

If I have a 'go to guitar' then this is it. Well unless I'm playing at being a thrash metal shredder when it's one of my EC29s. That is why this guitar is pictured at the top of my blog.

This was another secondhand purchase as a job lot with an Indie IT-30 amp. These had not been brilliantly cared for. The guitar had one odd machine head where the button from the original had been smashed off and one of the studs for the tailpiece had been pushed into the body damaging the lacquer on the top around it. It took me a while to notice the second fault and I suspect the seller didn't even know it had happened. There was a matching ding in the head of the bridge stud so it'd probably had quite a smack. Other than these two faults it had very minor play wear, almost like these had been done in a single incident perhaps during shipping or storage. The seller had recently moved house so maybe it was the removal men.

The machine head was easily solved as I discovered the generic 'tulip' machine heads sold by CH guitars on eBay were in fact identical to the ones used by Indie. Lots of the Korean guitar hardware sold by them (and AxesRUs) is identical to that used on Indie guitars, which was very useful to find out for my various modding projects.

The spec. is the usual good Indie stuff...

Body: Solid mahogany
Body Top: None
Body Binding: Single cream
Neck: Hard maple
Neck Binding: Single cream
Neck Construction: Set neck
Fingerboard: Rosewood
Fingerboard Inlay: Crown inlay
Headstock Binding: Single cream
Head Machine: Indie diecast tuner
Top Nut: Graphite
Bridge: Tune-o-matic with stop tail
Hardware: Chrome
Pickups: 2 humbucker/Indie standard
Electrics: 2 volume, 2 tone, 3-way toggle
Truss Rod: 2-way dual action
Scale Length/Frets: 628mm(24.7")/22 frets
Finish: Natural


...with this being a slightly modern take on the classic single cutaway Les Paul shape. It has Indies tidier later headstock design and their very nicely redesigned heel joint and cutaway. The curve of the upper bout follows through the heel and down to the cutaway. This makes for very good upper fret access and a slightly more distinctive design.

The simple mahogany body with natural finish looks great. In some ways I prefer this understated look to the more bling models. Nevertheless I thought the chrome hardware and pickups looked a bit anemic set against this and decided to undertake a little modding project.

Since discovering the wonder of P90s with my first Indie I'd been lusting after a Gibson BFG, which is a bare basic unfinished Les Paul with a P90 at the neck. As this was a very understated natural finish guitar I thought it would be interesting to do an Indie take on this.

I'd acquired a couple of Kent Armstrong humbucker sized P90s cheaply so already had something for the neck position for this project. I also had a vintage handwound Kent Armstrong PAF+ from the 80s which I wanted to make use of. This is a featureless epoxy potted lump with metal terminals protruding from it, quite unlike most pickups bar those used in the Dan Armstrong plexiglass guitars of the 70s.

The P90s had gold covers so I acquired a set of gold Les Paul hardware, swapped everything out, plonked the pickups in and wired it up. The result is a fantastically versatile reworking of the Les Paul formula. The neck P90 is creamy and the handwound bridge simply lovely. I wired it for coil tap and phase reversal with push-pull pots so you can get a load of different sounds for it. Being an Indie it plays beautifully, obviously.

I christened the result the 'BFI', being an obvious play on 'BFG' which I like because it's also an abbreviation many people I know use for 'brute force and ignorance'.

It stayed like this for some months but I was still unhappy with how it looked, I wanted more contrast between the body and the hardware. So I bought a set of black hardware and picked up a secondhand GFS Dream 90 for the neck position.

When I first swapped the hardware I left the chrome bridge & tail bushes in the body as the mismatch with the gold hardware didn't stand out too much. This time it was going to show so I built myself a basic puller using a block of wood, some nuts, bolts, and washers and a bit of old inner tube to stop it marking the body. I was very worried about getting the studs out but it proved pretty easy. The stud you can see removed in the photo is the one that had been pushed into the finish. As you can see the damage is very minor.

To tap the new ones in I screwed a bolt into them and placed a wooden block on top then gently used a deadblow hammer. This meant I wasn't damaging the finish as it went in. Having carefully lined up the splines on the new bushes with the path the old ones had cut they were a perfect fit and not loose at all.

I then put the original chrome machine heads back on as that felt the right way to go. Black machine heads in a black faced headstock didn't feel like it would be in keeping with the contrast between body and hardware I was creating elsewhere.

With the replacement pickup wired in and all the hardware fitted I also put some completely plain black knobs on in the place of the speed knobs to complete the 'minimal' look I was aiming for. I think it now looks as stunning as it sounds, all I've got to do is persuade Indie to do this as a production model with a soapbar P90 at the neck. :-)

Indie #12 - 'Super T' black sunburst

This is another Indie 'Super T', but an older one that's had a quite hard life prior to me getting hold of it.

I picked this up very cheaply from a studio that was relocating and getting rid of all its gear. There are knocks and chips all over it, even a couple of nasty digs in the back of the neck where it's obviously been repeatedly leant against a hard edge.

Even so it's 100% fine to play which made me decide this would make a fun modding project. There have been a couple of evolutionary stages to get to this point but what you see is how I think it'll stay for a while.

The main change is that I bought a 'Nashville' style Tele pickguard and two lipstick tube pickups from GuitarFetish. By default the Super T is routed for just one single coil and this was my first venture into routing guitar bodies. In the end I found it was quite simple really and I made a fairly tidy route even without using a template. The only bit I got wrong was that the lipstick tubes are quite tall when you include their brackets so I had to drill a little deeper at the ends of both routes after I started putting the guitar back together. Before this the pickup mounting screws were touching the bottom of the route. I tried shortening the screws but then the pickups were really close to coming undone all the time.
The bridge pickup is the original Indie humbucker. I briefly toyed with a P90 in there but wasn't happy with it. In order to make it match the lipstick tubes I've bought a gold pickup cover, soldered it on then wax potted  it. Another first for me, but it seems to have come out well.

While I was there I put in a phase reverse push-pull on the middle pickup so you can do out of phase sounds. Not something I'll use a massive amount but I like doing stuff like this "because it's there".

The hardware started out gold but some of it was scratched and corroded so I've changed it to black. While I was doing that I tried out some of the unbranded locking machine heads AxesRUs started selling. These are similar to locking Sperzels, with a thumbwheel on the back which you use to tighten a pin onto the string as it passes through the hole in the stem of the machine head. I've not described that very well, but suffice to say they work very very well indeed. I shall be buying more of these should I need to replace any machine heads in the future.

With all this done I've added a little versatility to it and in my opinion improved the looks a bit. The two lipstick tubes give me a really bright strat kind of sound but the bridge humbucker is quite high output and very rock. There's a nice contrast between the two.